Recipe for your first interactive tutorial
By Florencia D'Andrea in Tutorials
March 28, 2020
May 2020: Interview available on the RStudio blog about the tutorials https://education.rstudio.com/blog/2020/05/teach-interactive-course/
The aim of this post is to provide a route map highlighting the resources available to generate your own tutorial.
Hello
Last year I helped to transform some courses from a DataCamp format to Ines Montani framework. Here you have some examples of tutorials created with this framework.
After one busy year that included the end of my PhD finally I have some time to make a contribution to the community about how to build these tutorials.
Why to use Ines Montani framework?
1- Ted Laderas has written some “pros and cons” of using this framework in this post in the RStudio education blog explaining the differences between Ines’ framework with learnr package.
2 - Ines Montani documentation is really detailed. If you find problems in building the tutorial I strongly suggest you came back to her repo.
Do you teach a class using R and have a course that wants to convert to a tutorial? A course designed to be taught in a classroom is not exactly the same as an online tutorial. In the book Teaching Tech Together by Greg Wilson you can read more about the differences.
Recipe for an interactive tutorial ðŸ“
1. Ingredients
First, you have to divide your course into chapters. As a general rule there are 4 or 5 chapters in a tutorial.
The chapters can have:
-
Slides with explanatory text associated
-
Codeblock exercises
-
Multiple choise exercises
🤖
You can use decampr package to generate some of the basic file structures.
2. Copy the repository ðŸ
You should have an account on GitHub (it is free). If you do not know how to do this, please check the following webpage. If you want more information about git and GitHub in relation to R, I recommend the online book Happy git with R by Jenny Bryan.
The course starter R repository is on GitHub. You can get a copy using it as a template.
Remember that this framework is available for Python too.
3. Custom elements 📦
Slides with text
- ðŸ“
slides folder
- The slides are markdown (.md) files. It is good idea to name the file according to the chapter number and order of appearance, for example chapter2_01.md.
- How is the structure of the slides file? Ines described it here
Codeblock
- ðŸ“
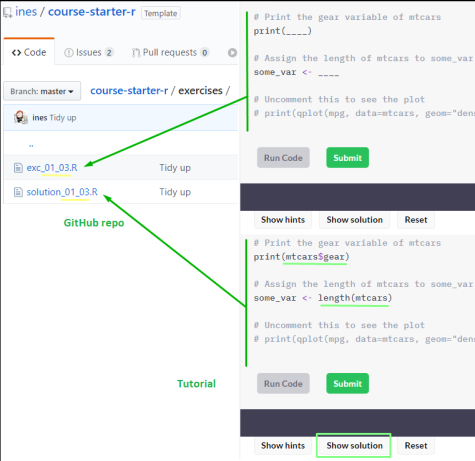
exercises folder
- Each exercise file has an associated a solution file (and ideally a test file)
- Tests are not fully developed yet.
- The names for each file should have the same reference number:
Multiple choise exercises
- ðŸ“
chapters folder
- There are not specific files for them, are generated inside each chapter file.
- Read more about them in the documentation
âš ï¸
Remember to include an id if more than one choice question is present in one exercise! You have an example here, in the second exercise
Chapters
-
📠chapters folder
- Each chapter is a markdown (.md) file.
- Chapter structure: you should include the name of the slides, exercises and solution files.

Do not forget 😮
-
Customize the meta.json file with the information corresponding to your course.
-
Add a profile picture and logo too! -> 📠static folder.
âš ï¸
Remember include the logo in .svg format! You can convert a .png or .jpg image to this format online
3. **Cooking!**ðŸ³
Have you added all your files to you repository? Now it is time to see if it works!
Remember to read the Section: Setting up Binder and checking that the file install.R has all the packages used in the tutorial -> 📠binder folder.
You will have to use Binder in your repo. This can take a while! â°
Meanwhile, you can start your account in Netlify for the deploy as Ines did, but this step could be skipped. Why to use netlify? I found this blogpost of Yihui Xie with an explanation. It is up to you!
As soon as you are using Netlify you will be able to visualize the changes that you are making in the tutorial. The code will not work in codeblock exercises until you use Binder in your repository.
4. Customization ðŸ’
- To add a summary and a course description as introduction
- Change logo size modifying width argument after .logo
- Change the colors Modify theme.sass
- Add a licence badge! You have to add it in the meta.json file.

This work is licensed under a Creative Commons Attribution-ShareAlike 4.0 International License.
5. Something is missing
âš ï¸
Remember that tests are not fully developed yet!. For more info, read the last section of the documentation.
Bon appétit ðŸ½!
Now you have your online tutorial ready to feed the community!
You can make a pull request to this repository that collects all the courses generated with this framework and other useful material to build your own course.
Thanks
I want to thank Noam Ross, Julia Silge, Ines Montani and Ted Laderas for deciding to leave the material of their courses for free.
- Posted on:
- March 28, 2020
- Length:
- 4 minute read, 827 words
- Categories:
- Tutorials
- Tags:
- Tutorials Ines Montani Framework
- See Also: